Inertia Electric User Manual
Introduction:
Power Flow Studies are an essential tool needed for the successful engineer to be able to analyze and design a power system. They are necessary for planning, operating, scheduling, and exchanging power between utilities. With the many inefficiencies seen around the world due to the aging grid, the demand for a transactive approach towards system analysis is a progressive step towards a more sustainable future. For the fellow electrical engineer, this manual provides a guide to preparing data for analyzing n-bus systems and obtaining their results for study. The Power Flow tool designed by Inertia Electric uses Python for analysis to meet the growing popularity of the language, and solves the system with the best technique available, the Newton Raphson Method.
User Input
To successfully use our power flow tool, the data must be formatted correctly. The user will need two CSV files for upload. It is essential that the files be named lines.csv and buses.csv for proper execution of our algorithm.
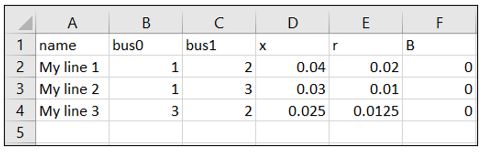
lines.CSV
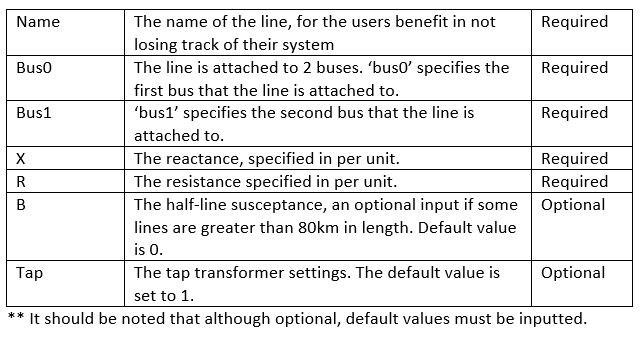
The first file, lines.csv, will contain the impedances in per unit specified on a 100MVA base. An example is provided below. Note that the variables are case-sensitive. They must be formatted as below. The inputs are summarized in the table.
buses.CSV
The second file, buses.csv, will contain the number of buses, which will need to be specified with only numerical values as shown below. In addition, it will need to specify the control type of the bus, the voltage magnitude if it exists, as well as the initial angles. Furthermore, the Load and Generator active and reactive powers at the bus will need to be specified according to the control type of the bus.

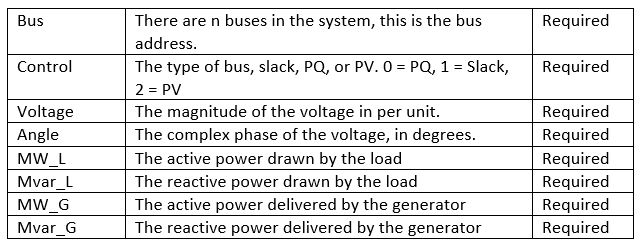
The control type is essential. A Slack bus is specified with the code 1. The PQ bus is specified with code 0. Lastly, the PV bus is specified with code 2. When creating your data sheets on Excel, make sure to save as a Comma Separated Value file (CSV). This way, python will be able to recognize the data and conduct the mathematical analysis. The link for conducting the analysis will be given in an email. The instructions for working on the Cloud9 IDE environment should be referred to if not already. Once the files have been uploaded, hit run, and give the program some time to finish running. The user will know that the analysis was successful when they see on the left-hand side of the application, a new Excel file with the name ‘Output.xslx’. This file can then be downloaded by the user with all the desired values at each bus contained. The active and reactive powers seen at each bus, the voltage magnitude at each bus as well as its angle. If there are any problems, please see the Contact Page for additional support.
Working on the Cloud9 IDE Environment
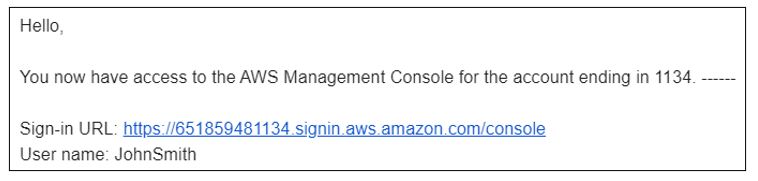
To access Inertia Electric’s product, you do not need an Amazon Web Services account (AWS). This is great for saving time and not hassling yourself with unneeded processes. One simply must send an email for a request to access our Cloud environment to one of the four founding members and wait for a reply. You will know that your request has been accepted when you receive an email from our team providing your login information. You will be given a password for your first use only, and it can be changed at login. Once you have successfully logged in, there will be a search button at the top of the window. Type in ‘Cloud9 Environments’.

This will take you to a new page, where the top left corner should look as below. Click on ‘Shared with you’. This will take you to a page where it will show the shared environments.

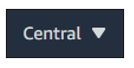
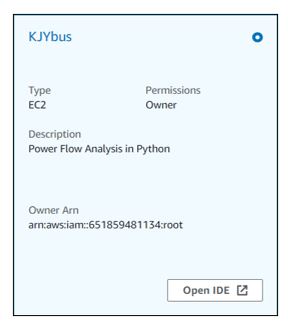
Assuming you only have one shared environment, there should be one option as shown below. Click on Open IDE. Note that if you are not able to see the shared environment, you can go to the top right corner and make sure that the region is specified as Canada – Central.
Congratulations! You are in the Inertia Electric Cloud 9 IDE environment. At the top left corner you should see something as below. You can now upload files and run them. A sample is shown below. The two csv files have been uploaded and appear below. Then, we run the .py file that should already be there and ready to use. The user can access the README file for additional support.

When you have received an email, it should look as below.